
When looking into Canvas apps as a replacement for InfoPath forms, or Nintex Forms, one of the first concepts to consider is repeating sections.
Canvas apps don’t have a pre-canned implementation of a mrepeating section in the way you might be familiar with them in InfoPath and Nintex. They do, however, have a concept of a Gallery - which is the same type of control as a repeating section.
The main difference a Canvas app Gallery has is, in order for it to behave like a form, where the contents of the repeating section gets saved only when the form is saved, the Gallery control needs to be bound to a Collection as it’s data source.
Collections are created in-memory, so the data is populated, and maintained, within the lifetime of the user’s Power App session. In this demonstration, the Collections will be populated by retrieving and saving data in a Dataverse table. Using the Gallery control, and Collections, can easily be adapted to other data sources as well, including SharePoint lists, and even, a hidden column in the form’s data source, using JSON.
The goal of this demonstration is to keep the repeating section data in memory until the rest of the form is ready to be saved or submitted. That way, users won’t end up with accidental data saved for forms they didn’t mean to submit.
There are 11 steps to add a repeating section to a Canvas App:
- Set up your Canvas app to accept an ID for previously saved form data
- Create the form’s Dataverse tables
- Configure the form’s data sources
- Add an Edit form to your Canvas app
- Add two Collections to your Canvas app to hold the repeating section data
- Add a Gallery to your Canvas app as the UI for your repeating section
- Add Text input controls to your Canvas app’s gallery
- Add a ‘Remove’ icon to your gallery
- Add an ‘Add’ button immediately below your gallery
- Update the Edit form’s OnSuccess property to save the repeating section data
- Add a ‘Save’ button to save or submit the data entered by the user
Read on to find out the detailed steps needed to create a repeating section on your Canvas App with behaviour you’d expect for users submitting a form.
Set up your Canvas app to accept an ID for previously saved form data
Your Canvas App will be used to load previously saved form data in to the app, so you need a way for it to accept the ID value of the form data to be loaded. The best way to do this is to add a formula to the OnStart property of the app.
From the Tree view in Power Apps Studio, select the App, and in the Properties pane, in the Advanced tab, find the OnStart property. Add the following formula:
If(Not(IsBlank(Param("LoadID"))), Set(LoadID, Param("LoadID")));
If(IsBlank(GeneratedTitle), Set(GeneratedTitle, "Submission by "&User().FullName));
Set(BlankGuid, GUID("00000000-0000-0000-0000-000000000000"));
This formula does three things:
- Looks for a query string parameter named
LoadID, if specified, sets an internal variable calledLoadIDto the value of the query string parameter - Checks if a variable named
GeneratedTitleis blank, if so, set the value of this variable to"Submission by [User.FullName]- this will be used later if the default Name Primary column remains in the Dataverse table, or if you’re using SharePoint lists to store your data, a value for your Title column. - Creates a variable named
BlankGuidwith a 0’ed out GUID value - useful if we want to test that a GUID hasn’t been generated yet as a record’s ID in Dataverse.
Create the form’s Dataverse tables
To save the form data, and the repeating section data, we’ll use two custom Dataverse tables:
| Display name | Dataverse Schema name | Description |
|---|---|---|
| Requests for Reimbursement | crc06_RequestForReimbursement | Stores the main form data |
| Request for Reimbursement Items | crc06_RequestForReimbursementItem | Store each form’s repeating section item data |
The Request for Reimbursement Items table has a relationship with the Requests for Reimbursement table, with a Lookup column named Requests for Reimbursement (or crc06_RequestForReimbursement)
Columns in Requests for Reimbursement Dataverse table
| Display name | Dataverse Schema name | Data type | Description |
|---|---|---|---|
| Requestor Full Name | crc06_RequestorFullName | Single line of text | The full name of the user requesting reimbursement |
| Expenditure Cost Centre | crc06_ExpenditureCostCentre | Whole number | The cost centre all line items will default to when they are entered in the repeating section |
Columns in Request for Reimbursement Items Dataverse table
| Display name | Dataverse Schema name | Data type | Description |
|---|---|---|---|
| Description | crc06_ItemDescription | Single line of text | Users enter a description for each line item of their reimbursement request |
| Cost Centre | crc06_ItemCostCentre | Whole number | Users assign each line item of their reimbursement request a cost centre |
| Expense Code | crc06_ItemExpenseCode | Single line of text | Users assign each line item an expense code |
| Amount | crc06_ItemAmount | Currency | The line item’s value in dollars |
| Total Amount | crc06_ItemAmountTotal | Single line of text | The line item’s total value in dollars (including tax, etc) |
| Index | crc06_Index | Numeric | A numeric value indicating the sort order each line item should display in |
Note: only columns used for the purpose of this blog post are shown here; the form itself includes more but they aren’t necessary for this demonstration
Configure the form’s data sources
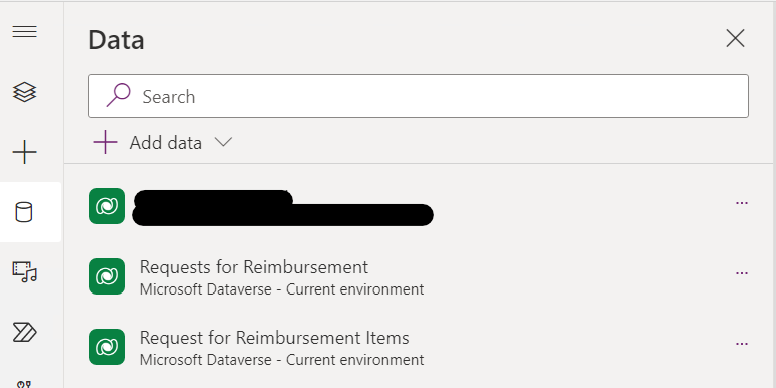
From the Data view in Power Apps studio, click the Add data button. In the Current environment heading, you should see the two custom Dataverse tables created previously. Add both of them to your Canvas app
After the data sources are added, you should see the two data sources listed in the Data view, named as follows:
- Requests for Reimbursement
- Request for Reimbursement Items
Add an Edit form to your Canvas app
From the Tree view in Power Apps Studio, select the screen, and use the Insert button found in the tool bar to insert an Edit form control.
In the Tree view, select the newly added Edit form control. In the Properties pane, in the Properties tab, select the Data source created in the previous step: Requests for Reimbusement
Use the Edit fields link immediately below the Data source property to choose which fields in the Dataverse table should be shown on this form.
Swap to the Advanced tab in the Edit form’s Properties pane, and add the following formula to the OnSuccess property:
Set(LoadID, ClaimDetailsForm.LastSubmit.RequestForReimbursement);
In this formula, the Set() function updates a variable in your Canvas App named LoadID - any time the form is successfully submitted, the LoadID variable is updated with the ID value from the record created / updated during submission.
It is a good idea to rename the Edit form control so it can be referenced in other Power Fx formulas without confusion. For this example I named my Edit form control: ClaimDetailsForm
 property of an Edit Form control in Power Apps Studio](/assets/screenshots/2023-04/canvas-app-form-onsuccess.png)
Add two Collections to your Canvas app to hold the repeating section data
To create a Collection in Power Fx, use the ClearCollect() function. If like my Power App, you have multiple forms in the same app, and each form has its own Screen, I find the best place to create the Collection is in the OnVisible property of the screen used to first load the form.
From the Tree view in Power Apps Studio, select the screen, and in the Properties pane, in the Advanced tab, find the OnVisible property. Add the following formula:
If(IsBlank(LoadID),

    ClearCollect(ReimbursementOfExpense_Items, { Description: "", CostCentre: "", ExpenseCode: "", Amount: 0, AmountTotal: 0, ReimbusementOfExpenseID: GUID(LoadID), ID: BlankGuid, Index: 0 }),

    ForAll(Filter('Request for Reimbursement Items', RequestForReimbursement.RequestForReimbursement = GUID(LoadID) ), Collect(ReimbursementOfExpense_Items, {
        ID: crc06_requestforreimbursementitemid,
        Description: Description,
        CostCentre: Text('Cost Centre'),
        ExpenseCode: 'Expense Code',
        Amount: Amount,
        AmountTotal: Total,
        Index: Index
    }))

);

ClearCollect(ReimbursementOfExpense_Items_SaveData, ReimbursementOfExpense_Items);
This formula performs the following:
If()function checks if theLoadIDvariable is blank, andClearCollect()creates a collection namedReimbursementOfExpense_Items- The properties specified in the first
ClearCollect()function match the columns in the Request for Reimbursement Items Dataverse table:Description,CostCentre,ExpenseCode,Amount,AmountTotal.ReimbusementOfExpenseID, andIndex - If the
LoadIDvariable is not blank, populates theReimbursementOfExpense_Itemscollection with values by executing theForAll()andCollect()functions across theRequest for Reimbursement Itemsdata source - The second
ClearCollect()function clones theReimbursementOfExpense_Itemscollection to a second collection namedReimbursementOfExpense_Items_SaveData
Add a Gallery to your Canvas app as the UI for your repeating section
Click the Insert button found in the Power Apps Studio tool bar. Insert a Vertical gallery to your screen.
Tip: Use the Vertical gallery control, do not use the Blank vertical gallery control because a bug in the Power Apps Studio UI means you can’t add child controls to a blank gallery
When asked to select a data source, select the ReimbursementOfExpense_Items collection, which should be listed under the In your app heading.
From the Tree view in Power Apps Studio, select the newly added gallery, and in the Properties pane, in the Advanced tab, find the Items property, and change it to the following formula:
SortByColumns(ReimbursementOfExpense_Items, "Index")
This formula ensures the order of the items in the gallery remains consistent with the order they were entered.
Add Text input controls to your Canvas app’s gallery
In the Tree view, expand the gallery, and select one of the components already in the gallery. Using the Insert button in the tool bar, add 5x Text input controls.
Then, delete all the other controls not needed in the gallery, e.g. Separator1 NextArrow1, Subtitle1 etc.
With each Text input control you added to the gallery, first rename them by right-clicking the control in the Tree view pane, and selecting Rename. The name should marry up to the five columns created in the Request for Reimbursement Items Dataverse table: e.g. ItemDescriptionInput, ItemExpenseCodeInput, ItemCostCentreInput, ItemAmountInput, ItemAmountTotalInput
Then, for each Text input control, open the Properties pane, and go to the Advanced tab. Update the OnChange and Default properties as follows:
-
OnChange property:
Patch(ReimbursementOfExpense_Items_SaveData, LookUp(ReimbursementOfExpense_Items_SaveData, Index = ThisItem.Index), { Description: Self.Text });- Modify
Description:to match the name of the column, and the corresponding name of the Input box - For numeric values
AmountandTotalAmount, wrap theSelf.Textreference with theValue()function, e.g.Amount: Value(Self.Text)
- Modify
-
Default property:
ThisItem.DescriptionModify
Descriptionto match the name of the column
It is a good idea to resize and position each Text input control now so they don’t overlap each other, and so they fit inside your Gallery control. You may also want to change the size of the Gallery control so it doesn’t take more room than it needs to.
Tip: I like to make the gallery height expand with the number of items. The Height property of the gallery can be updated with a formula like this:
CountRows(ReimbursementOfExpense_Items)*110
Add a ‘Remove’ icon to your gallery
Using the Tree view, select one of the controls inside your Gallery control, and use the Icon button in the tool bar to insert an icon. I like to use the “Cancel” icon because it is an obvious choice by the user to delete a record by clicking it.
Select the Icon control you just added, and in the Properties pane, under the Advanced tab, update the OnSelect property as follows:
If(CountRows(ReimbursementOfExpense_Items_SaveData) > 1, Remove(ReimbursementOfExpense_Items_SaveData, LookUp(ReimbursementOfExpense_Items_SaveData, Index = ThisItem.Index)));

ClearCollect(ReimbursementOfExpense_Items, ReimbursementOfExpense_Items_SaveData);
This formula performs the following:
CountRows()andIf()checks the number of rows in theReimbursementOfExpense_Items_SaveDatacollection - the remove action will only execute of the number of rows is greater then 1Remove()removes the record from theReimbursementOfExpense_Items_SaveDatacollectionClearCollect()synchronises theReimbursementOfExpense_Itemscollection with theReimbursementOfExpense_Items_SaveDatacollection
Tip: You may be wondering why there are two collections
ReimbursementOfExpense_ItemsandReimbursementOfExpense_Items_SaveDatain this example. The reason is to avoid odd behaviour in Canvas Apps with the OnChange property of the text inputs. If you update the gallery’s data source directly in an event inside the gallery, the gallery effectively resets itself, and the UI doesn’t behave as you’d expect it to. The cursor position is lost any time the gallery’s data source is updated, so using the keyboard to tab around the text inputs after the field is changed means the cursor returns to the first field.
Add an ‘Add’ button immediately below your gallery
Insert a Button control to your screen, which will be used to add items to the repeating section. From the Tree view in Power Apps Studio, select the newly added Button control, and in the Properties pane, in the Advanced tab, find the OnSelect property, and add the following formula:
Collect(ReimbursementOfExpense_Items_SaveData, {
    Description: "",
    CostCentre: "",
    ExpenseCode: "",
    Amount: 0,
    AmountTotal: 0,
    ReimbursementOfExpenseID: GUID(LoadID),
    ID: BlankGuid,
    Index: Max(ReimbursementOfExpense_Items_SaveData, Index) + 1
});

ClearCollect(ReimbursementOfExpense_Items, ReimbursementOfExpense_Items_SaveData);
This formula performs the following:
Collect()adds a new record to theReimbursementOfExpense_Items_SaveDatacollection with blank or 0 values; it also ensures the value ofReimbursementOfExpenseIDis the same as the form’sLoadID, and theIndexproperty is 1 more than any previously added record in the collectionClearCollect()synchronises theReimbursementOfExpense_Itemscollection with theReimbursementOfExpense_Items_SaveDatacollection
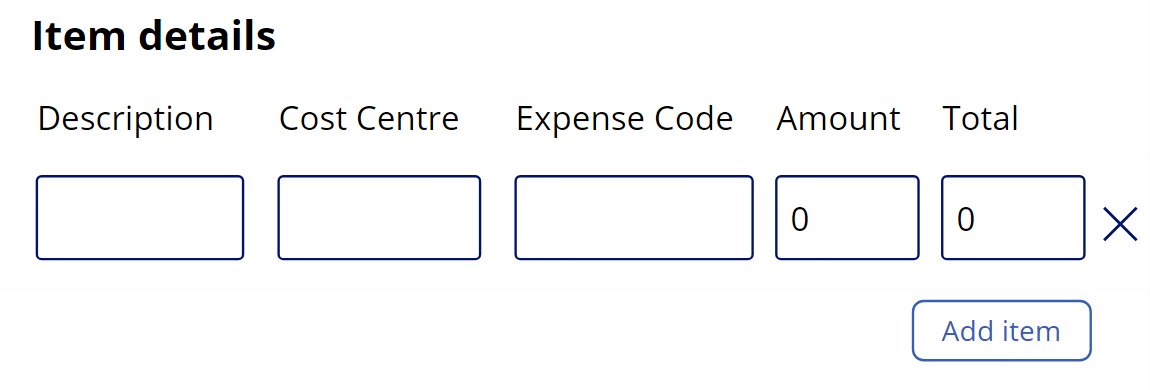
I added a heading and field labels immediately above my Gallery control. These are cosmetic, they ensure the user knows which field they are editing when working with the repeating section.
Update the Edit form’s OnSuccess property to save the repeating section data
in a previous step, we added a formula to the Edit form control’s OnSuccess property.
We now want to update the OnSuccess formula to perform additional actions.
In the Tree view in Power Apps Studio, select the Edit form control added earlier. In the Properties pane, in the Advanced tab, update the OnSuccess property to the following formula:
Set(LoadID, ClaimDetailsForm.LastSubmit.RequestForReimbursement);

ForAll(
    ReimbursementOfExpense_Items_SaveData,
    Patch(
        ReimbursementOfExpense_Items,
        LookUp(ReimbursementOfExpense_Items, Index=Index),
        {
            ID: Patch(
                'Request for Reimbursement Items',
                If(
                    ID = BlankGuid, Defaults('Request for Reimbursement Items'),
                    LookUp('Request for Reimbursement Items', crc06_requestforreimbursementitemid = ID)), {
                        Name: Description,
                        Description: Description,
                        'Expense Code': ExpenseCode,
                        'Cost Centre': Value(CostCentre),
                        Amount: Amount,
                        Total: AmountTotal,
                        RequestForReimbursement: ClaimDetailsForm.LastSubmit,
                        Index: Index
                    }
                ).crc06_requestforreimbursementitemid
        }
    )
);

ClearCollect(
    ReimbursementOfExpense_Items,
    ForAll(
        Filter(
            'Request for Reimbursement Items',
            RequestForReimbursement.RequestForReimbursement = GUID(LoadID)
        ),
        {
            ID: crc06_requestforreimbursementitemid,
            Description: Description,
            CostCentre: Text('Cost Centre'),
            ExpenseCode: 'Expense Code',
            Amount: Amount,
            AmountTotal: Total,
            Index: Index
        }
    )
);

ClearCollect(ReimbursementOfExpense_Items_SaveData, ReimbursementOfExpense_Items);
The new steps added to this formula do the following:
-
ForAll()goes through the records in theReimbursementOfExpense_Items_SaveDatacollection, performs aPatch()against theRequest for Reimbursement ItemsDataverse table, updating the table’s values with the values fromReimbursementOfExpense_Items_SaveData -
The
ForAll()also updates theReimbursementOfExpense_Itemscollection, to bring the ID value of the Dataverse record in to memory so future Patches update the same Dataverse record instead of creating new ones -
The
ClearCollect()refreshes theReimbursementOfExpense_Itemscollection with the data from the Dataverse table, to ensure it remains in sync with the stored data.
Add a ‘Save’ button to save or submit the data entered by the user
Below the ‘Add’ button, create another button, this time to Save or Submit the form data. Because all the complexity of the repeating section is contained within the Edit form control’s OnSuccess property, the save button is very simple.
Select the Save button in Power Apps Studio, and in the Properties pane, in the Advanced tab, find the OnSelect property, and add the following formula:
SubmitForm(ClaimDetailsForm);
Set(LoadID, ClaimDetailsForm.LastSubmit.RequestForReimbursement);
This formula submits the Edit form named ClaimDetailsForm, which saves the data of the form. When the Edit form successfully saves, the repeating section’s item info is also saved because the formula in the OnSuccess property of the ClaimDetailsForm executes.